Flipgrid — an Alternative to Skype Lessons
This week universities and schools across the country announced a transition to online instruction in response to concerns over the COVID-19 virus. That means that many applied music faculty and private lessons teachers are working to figure out how to do something remotely that typically relies heavily on direct interaction.
Let’s get this out of the way - you should reconsider teaching your applied lessons over Skype (or any other synchronous format)
Here’s why -
Synchronous lessons require students and teachers to have access to regular internet, and that may not be the case. It also requires a huge amount of data, and if students are being asked to complete all of their coursework online that data is going to be used up very quickly.
The sound quality of synchronous lessons can be a real obstacle unless both the student and teacher have access to additional microphones or software (speaking specifically about tuba, it sounds *bad*)
Synchronous lessons require that the students and teachers be available (and have access to the internet and computers / tablets / phones) at the same time, and with additional concerns such as child care, adjusted work schedules, family in the house, others trying to share the computer/ internet / data, etc. – trying to find a time where both the student and teacher are available and can actually make noise (sing, play tuba, or whatever else) is excessively challenging for both parties.
Instead of synchronous lessons, I would recommend creating a system where students upload audio or video assignments and you provide feedback (aka asynchronous teaching). This allows the students to record and upload material when it is most convenient for them (and whomever they are living with), and also gives teachers the same flexibility.
My favorite tool for this job is Flipgrid (flipgrid.com). Unlike YouTube or Vimeo (or similar services), Flipgrid allows students to record directly to the app or website. This means that students do not need to actually have space on their phones or computers to record and save videos. In addition, there is no need to create and upload videos separately (which also takes up quite a bit of data or bandwidth) – students can post directly to Flipgrid with minimal delay and minimal strain on their internet resources. Flipgrid also allows for easy teacher feedback, either in video or text format. There are training courses available online through FlipgridPD and an extensive help database. In addition, students and teachers can access Flipgrid for via their website or an app (free on iOS and Android), and the entire service is free to use for both teachers and students (no payments for upgrades or additional resources).
The only drawback to Flipgrid that I see is that the maximum length of a video is five minutes, which may mean students have to record pieces in parts. Though a video any longer than that would be harder to share and upload, so that five minute time limit may be a blessing in disguise.
Here is how I will be structuring my remote lessons until classes resume as normal -
(First create an account with Flipgrid - I recommend using your .edu email as Flipgrid is free to all educators and students).
When you see your main page, it will say “My Grids” at the top. Each grid is like a separate class. You can set it up to be as private or not private as you want to – I recommend giving each of your students their own grid and setting it up using their student id – this will allow them to login using a unique identifier - the identifiers can be anything you want - their first name, ID #, lunch PIN, etc. You'll also get a custom QR code for each student. That way the videos they post will not be public to the rest of your studio. I have also created an additional grid that is open to all my students where they can share videos and provide feedback (similar to how I usually structure my studio class time).

Under the grid, you can create topics – these are meant to be discussion topics, but you can use them to help differentiate your assignments for each student (fundamentals, etudes, solo) or by week (week 1, week 2) – or however you like to organize your teaching. I will be structuring mine week by week.

As mentioned above, I will be using my studio class grid to allow students the opportunity to play for one another and provide feedback, as well as keep on on their Key of the Week assignments.
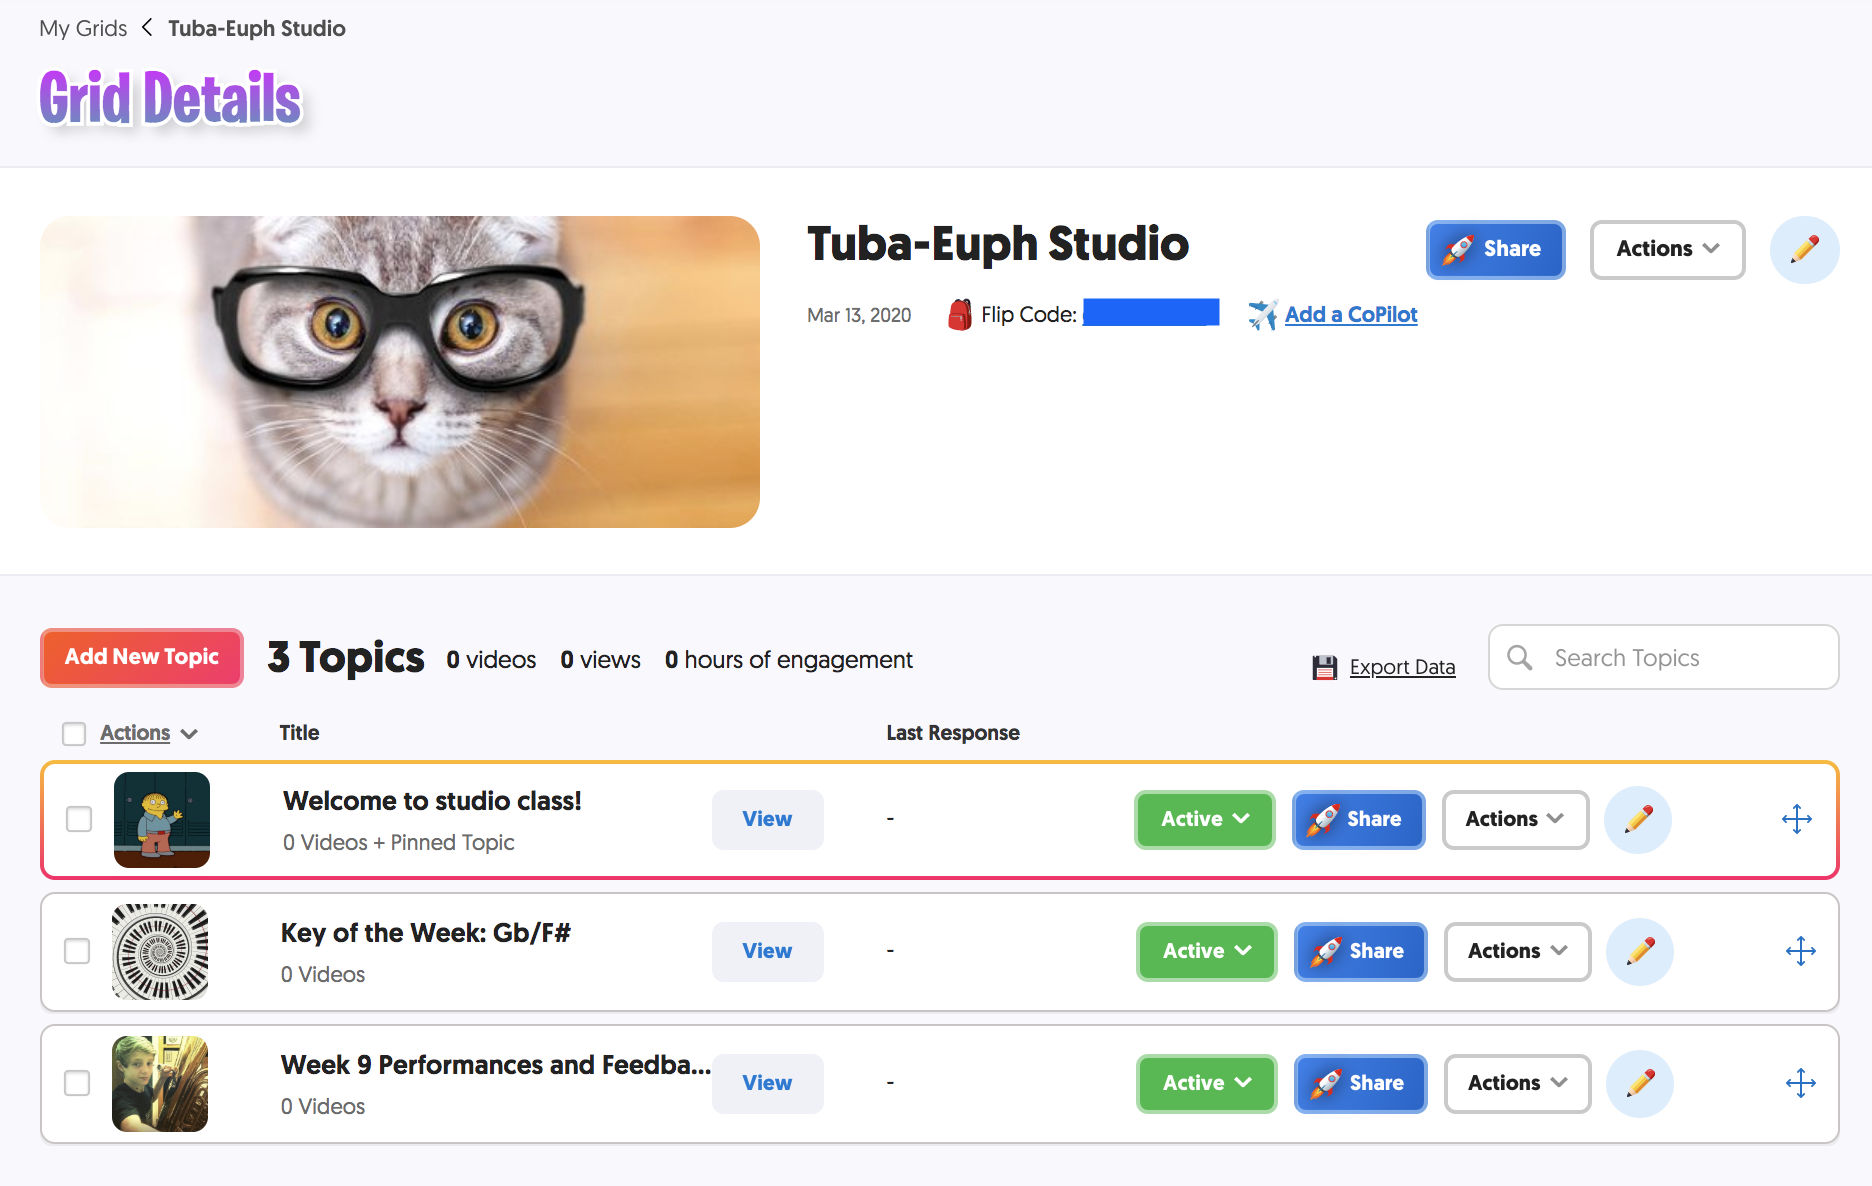
When you set up your topics within each grid, you have the option of selecting the maximum length of videos - I always set mine to 5 minutes to allow students as much time as possible to record. You can also include a title and instructions, and add what Flipgrid calls a focus - this can be a video you create with instructions on the assignment, a video you link from YouTube or Vimeo, or a variety of other things. I like to select a Giphy because I think they’re kind of fun :) -


Once your grids and topics are created, you can invite students to join. If you set up the grids using Student IDs, you can share the grids with students via link, code, or QR (in addition to several other options). Students will see the screens below. Once they have entered their code, they will be prompted to enter the Student ID you created for them (so be sure to share it, or let them know where to find it!). They will then be taken to the grid home. From there they can easily add a video by tapping the green plus sign in the lower right of the screen. Recordings can be started and stopped using the red video camera icon (you can pause and restart recording even within a single video by tapping this button) and then share using the play icon in the lower right of the screen. From there they will be prompted to take a selfie, title their video, and submit it.


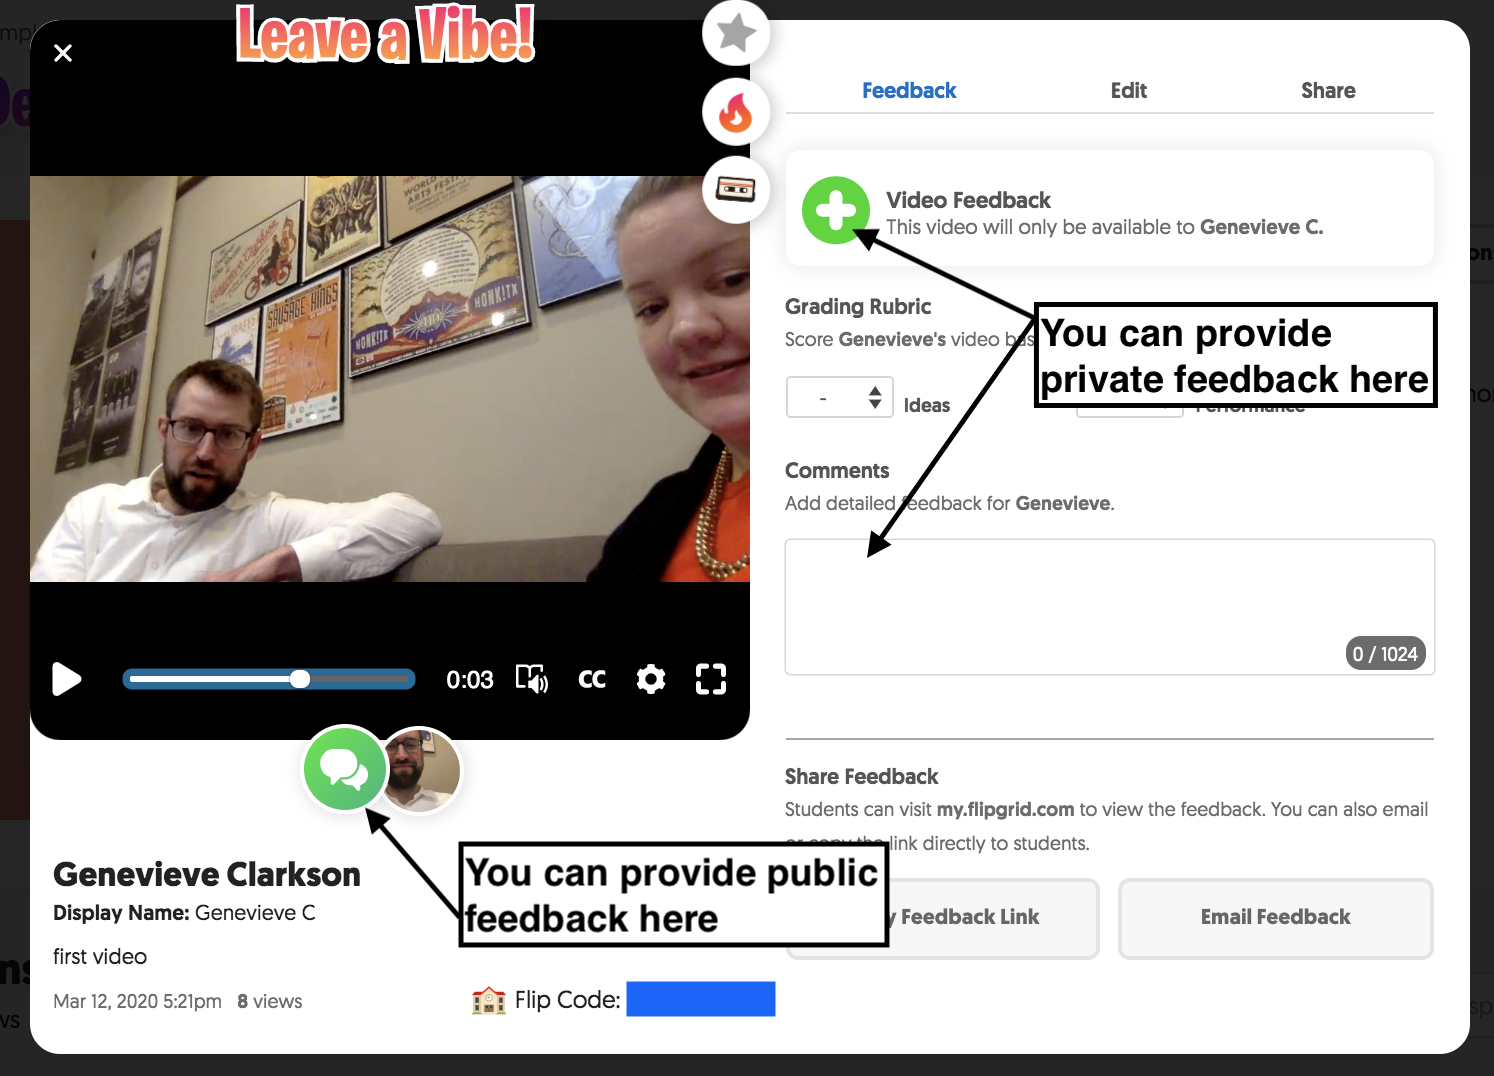
Teachers can provide feedback in text or video format, and can email that feedback directly to students as well. If you’ve set up your grid to be just for one student, only that student will see the feedback. If you have a grid set up for a group of students, you can provide private feedback using the right hand side of the screen or public feedback using the green chat button under the video.
A note about feedback - you should plan to either share the feedback link with your students or email your students feedback after it has been submitted to ensure they see it. A feedback notification is not automatically generated through Flipgrid. More details on feedback via Flipgrid can be found here.
And as I mentioned earlier, Flipgrid has a well-developed help center as well as free training videos and I have always found the answers I needed there.
An additional plus to Flipgrid is that it’s available on Andorid and iOS (free to download and use with an .edu email address) and easy to use on phones, tablets, and computers (with a camera or webcam). Be sure to grant Flipgrid access to your camera and microphone when prompted to avoid having to maneuver the app settings later on.
And now for the actual structure of lessons -
Because Flipgrid only allows for a maximum length of five minutes, I will be having my students share several shorter video assignments throughout the week - the deadlines for these videos will be midnight, and my plan is to provide feedback the next day by noon. My students enrolled in two-credit hour lessons (one 60-minute lesson per week) will share four lesson videos to their private grid (staggered throughout the week) and one scale assignment video to the studio class grid. The number of weekly videos for students in one, three, and four -credit hour lessons will adjust accordingly.
I will have half of my studio post a video in our Studio Class grid every week by Wednesday at midnight and will ask the rest of the studio to listen and provide video feedback by the following Sunday at midnight.
Even though I am avoiding synchronous teaching, I do plan to schedule time with each of my students to check in via video chat - we will use this time to talk and touch base, but not to play. I want to make sure my students still know I am available to them, even though we aren’t meeting in person.
In closing, here some additional thoughts as many of us transition to teaching our courses online -
Do not try to duplicate the experiences that in-person instruction offers as that is a bit of a fool’s errand. Look at your course objectives, and find new ways to meet them. This may involve some creativity – don’t be afraid to brainstorm with colleagues at your own or other institutions.
Because many students use their phones as a metronome and tuner, they may not be able to record video and use their metronomes at the same time (among other things) – be thoughtful about what you ask your students to do, and flexible if they have trouble completing assignments in the ways you’ve structured them.
Be conscious of how the time commitment of your assignments relates to the actual credit hours of your course. An activity that you might typically do in class may take significantly more time to complete remotely. If my students regularly spend one hour in their private lesson and one hour in studio class in a given week, I don’t want their online assignments to exceed two total hours of hands-on time (obviously, this does not include the practice that has to be done in order to prepare for these assignments). For example, if a student is recording five five-minute videos a week (four assignments and one scale video) in addition to watching between four and five studio class peer recordings and providing feedback for them - that should total about two hours of total hands-on time.
ASK FOR FEEDBACK OFTEN – students may be afraid to let you know that they are having trouble completing assignments in this new format, or to share with you the personal situations surrounding their challenges. Do your best to create an open space for students to let you know what’s going on with them – and don’t assume that a student who misses an assignment is a bad student. Give your students the benefit of the doubt and move through this transition under the assumption that we are all trying the best we can.
Thank you for taking time to read and consider! I will add a PDF of this post to my resources page in case anyone wants to download a copy - good luck, and please share / comment below if you have any thoughts or questions!
3.16.20 UPDATE -
if anyone is interested in seeing Flipgrid from the student perspective, I have created a sample grid for you to use here - you will need to use a Microsoft or Google account to login, and the grid password is practice2020